Configure Apple Mail as your email client (IMAP)
To configure Apple Mail, you first need to verify your primary domain, then check the IMAP settings for an email client :
- Verify your primary domain
- Log in to your control panel, then go to DomainCentral
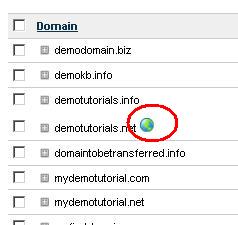
- Your primary domain is denoted by a globe icon. In this example, our primary domain is demotutorials.net
- Log in to your control panel, then go to DomainCentral
- Start Apple Mail. Select File > Add Account. The Add Account wizard opens - it guides you through this process step by step

- Fill out the following fields:
- Full Name - enter the name of the mailbox owner, exactly how you want it to appear in the "From" field on your emails. For example, John Forth
- Email Address: enter the full address of your Hosting Support mailbox. In this example, it's administrator@demotutorials.net
- Password - enter the mailbox password. If you don't remember what the password is, go back to MailCentral. You can reset mailbox password there.
Click Continue once you've completed this step.

- For Incoming Mail Server, complete the fields as follows:
- Account Type - select IMAP from the dropdown
- Description - enter an email account description, which will appear in your Apple Mail account list. You might want to make this descriptive, like "Hosting Admin Mailbox"
- Incoming Mail Server - enter imap.primarydomain, where primarydomain is the domain you verified in the first step. In this case the primary domain is demotutorials.net, so the incoming server is imap.demotutorials.net
- User Name - enter the full address of your mailbox (a common mistake is to enter just Administrator, or the name, not the actual full address)
- Password - enter the mailbox password (should be filled out already)
Click Continue once you've completed this step.

- For Outgoing Mail Server, complete the required fields as follows:
- Description - enter the same description as in the previous screen
- Outgoing Mail Server - the outgoing mail server is smtp.primarydomain. In this case, the primary domain is demotutorials.net, so the setting is: smtp.demotutorials.net
- Use Authentication - check the box
- User Name - enter your full mailbox address
- Password - enter your mailbox password
Click Continue once you've completed this step.

- Check the account summary to make sure that all setting were entered correctly. If it is correct, click Create. You are done!

- Your new account appears in the list of Mailboxes in your Apple Mail. Notice that the mailbox description that you created in step 4 above is displayed as this mailbox's name.
